
You stare at your tiny bathroom and feel closed in. The walls seem to press inward. You struggle to find space for even basic toiletries. A cramped bathroom creates stress right when you need to relax. You deserve a sanctuary that feels open and airy regardless of the actual square footage.
We have curated specific design strategies to trick the eye and maximize every inch. These methods transform tight quarters into breathable retreats. You will learn how light manipulation and smart fixtures alter spatial perception. You will discover storage hacks that hide clutter without consuming floor space. A small footprint does not mean you must sacrifice style or comfort.
Key Takeaways
- Light colors and high gloss finishes bounce light around the room to blur boundaries and create depth.
- Floating fixtures and open shelving expose more floor and wall surface area to trick the brain into perceiving more space.
- Vertical storage and large format tiles draw the eye upward and outward to reduce the feeling of confinement.
- Glass enclosures remove visual barriers that shower curtains create.
Table of Contents
- Use Light Colors to Brighten the Space
- Incorporate Reflective Surfaces
- Keep It Minimalist
- Maximize Natural Light
- Layer Your Lighting
- Choose Floating Fixtures for an Open Look
- Opt for Open Shelving Instead of Bulky Cabinets
- Utilize Vertical Space for Storage
- Select the Right Tiles
- Use a Glass Shower Enclosure
- Vertical Stripes for Height and Elegance
- Sliding Doors: A Space-Saving Upgrade
- Right-Sized Fixtures for Maximum Efficiency
- Translucent Partitions for Open Privacy
- A Statement Piece to Command Attention
- Popular Asked Questions
- Conclusion
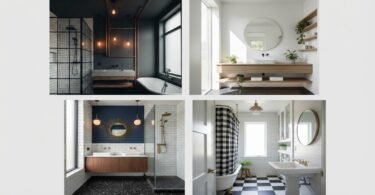
Use Light Colors to Brighten the Space
White and soft pastels act as the primary expanders in interior design. Dark colors absorb light and define the corners of a room clearly. Light hues reflect light and soften those corners. The walls seem to recede rather than encroach. You create a seamless envelope when you paint the ceiling the same shade as the walls. This technique prevents the eye from stopping at the ceiling line. The room feels taller and airier immediately.
You do not have to stick to clinical white. Soft creams and pale grays work beautifully. Even a whisper of blue can mimic the sky and add an organic openness. High gloss paint on the ceiling bounces light down like a mirror. Keep the floor color light as well to maintain the continuous flow. A unified color palette reduces visual noise and allows the architecture to breathe.
Pro Tip: Use a satin or semi gloss finish on the walls to increase light reflection compared to matte finishes.
Incorporate Reflective Surfaces

Mirrors are the oldest trick in the designer handbook for a reason. A large mirror over the vanity doubles the visual depth of the room. It reflects both natural and artificial light to brighten dark corners. Consider spanning a mirror across the entire wall rather than just above the sink. This creates the illusion that the room continues into another space. You can also use mirrored cabinet fronts to hide storage while expanding the room.
Glossy tiles function similarly to mirrors. They catch light and shimmer to add movement to static walls. Chrome or polished nickel faucets add sparkle and prevent the hardware from feeling heavy. Glass accessories like jars and soap dispensers allow light to pass through them. Every reflective surface you add contributes to the overall luminosity. The goal is to keep the eye moving across surfaces rather than landing on a solid barrier.
Pro Tip: Place a mirror directly opposite a window to maximize the intake of natural light.
Keep It Minimalist
Clutter makes a small room feel like a closet. Visual chaos shrinks space faster than dark walls. You must adopt a rigorous editing process for your bathroom surfaces. Countertops should remain clear of daily products. Store toothbrushes and lotions in drawers or cabinets. A clean surface allows the eye to travel smoothly across the room. The lack of obstruction creates a sense of calm and order.
Choose decor with intention. A single vase with greenery has more impact than ten small trinkets. Minimalism does not mean empty. It means everything has a purpose and a place. Use trays to corral necessary items if you lack drawer space. Uniform bottles for shampoo and soap reduce label noise. The reduction of visual data allows the brain to process the room as spacious.
Save this idea to your Pinterest.
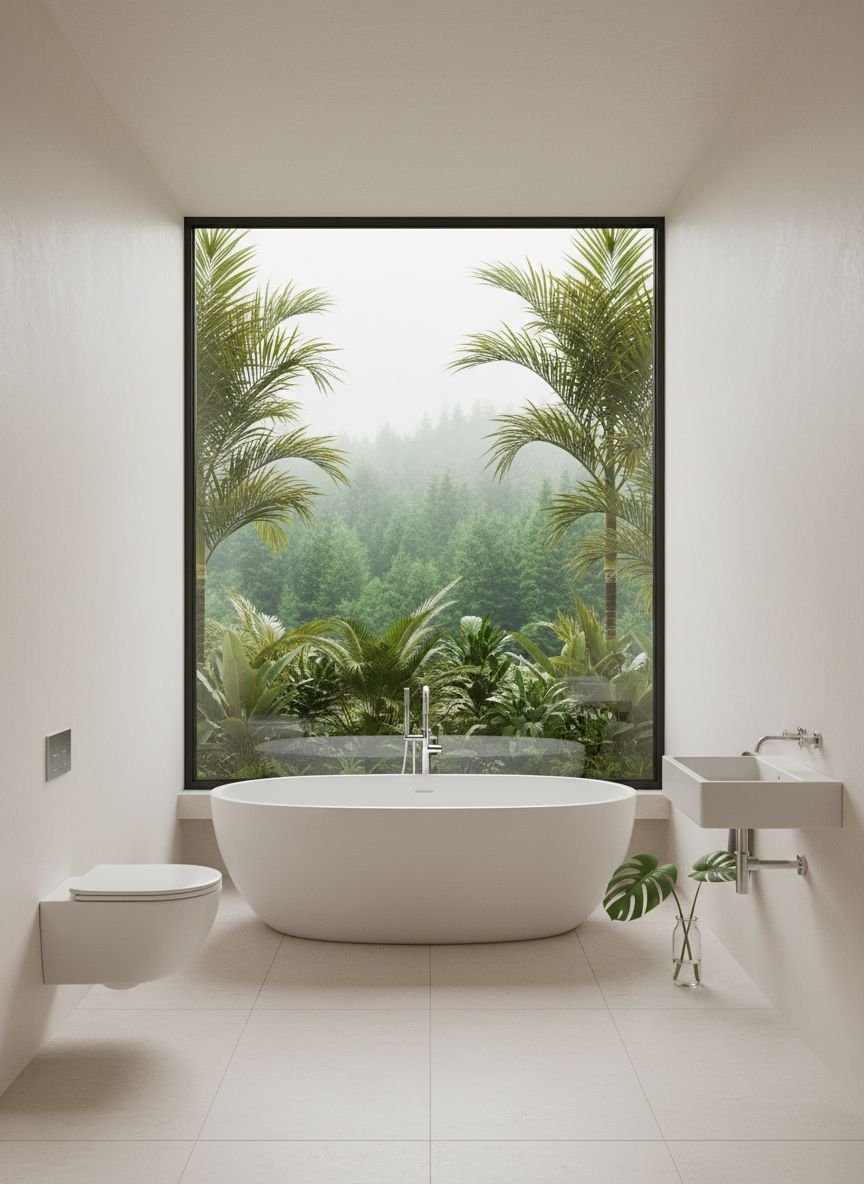
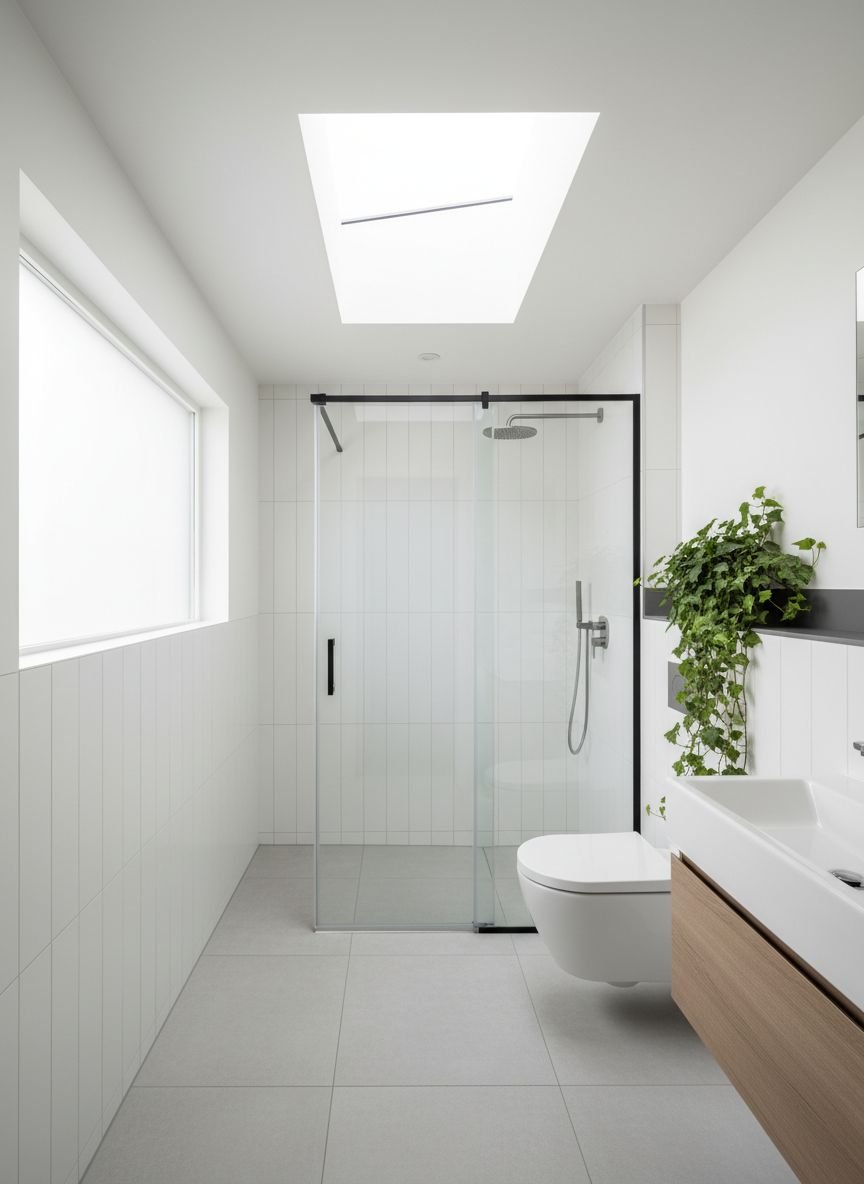
Maximize Natural Light
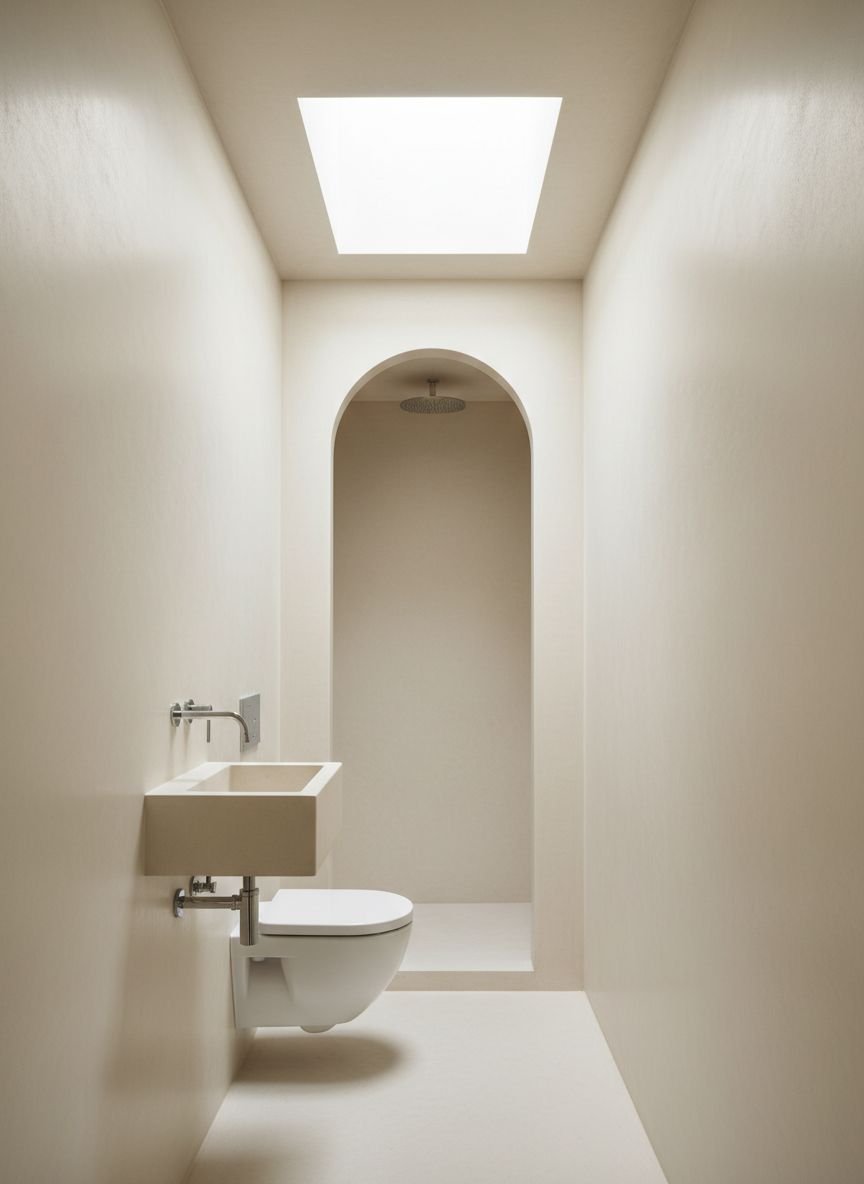
Sunlight is the most effective tool for opening up a cramped interior. You should never block a bathroom window with heavy drapes or blinds. Opaque treatments cut off the connection to the outdoors. Use frosted glass or sheer shades to maintain privacy while letting light pour in. If you are renovating you might consider adding a skylight. Top down light washes the walls and makes the ceiling feel infinitely high.
Clean your windows regularly to ensure maximum transparency. Even a layer of dust blocks a surprising amount of sun. If a window is not an option you can use solar tubes. These channel sunlight from the roof down into windowless bathrooms. Natural light renders colors accurately and makes the space feel fresh. It eliminates the cave like feeling common in small baths.
Pro Tip: Keep the window sill clear of clutter to allow light to enter unobstructed.
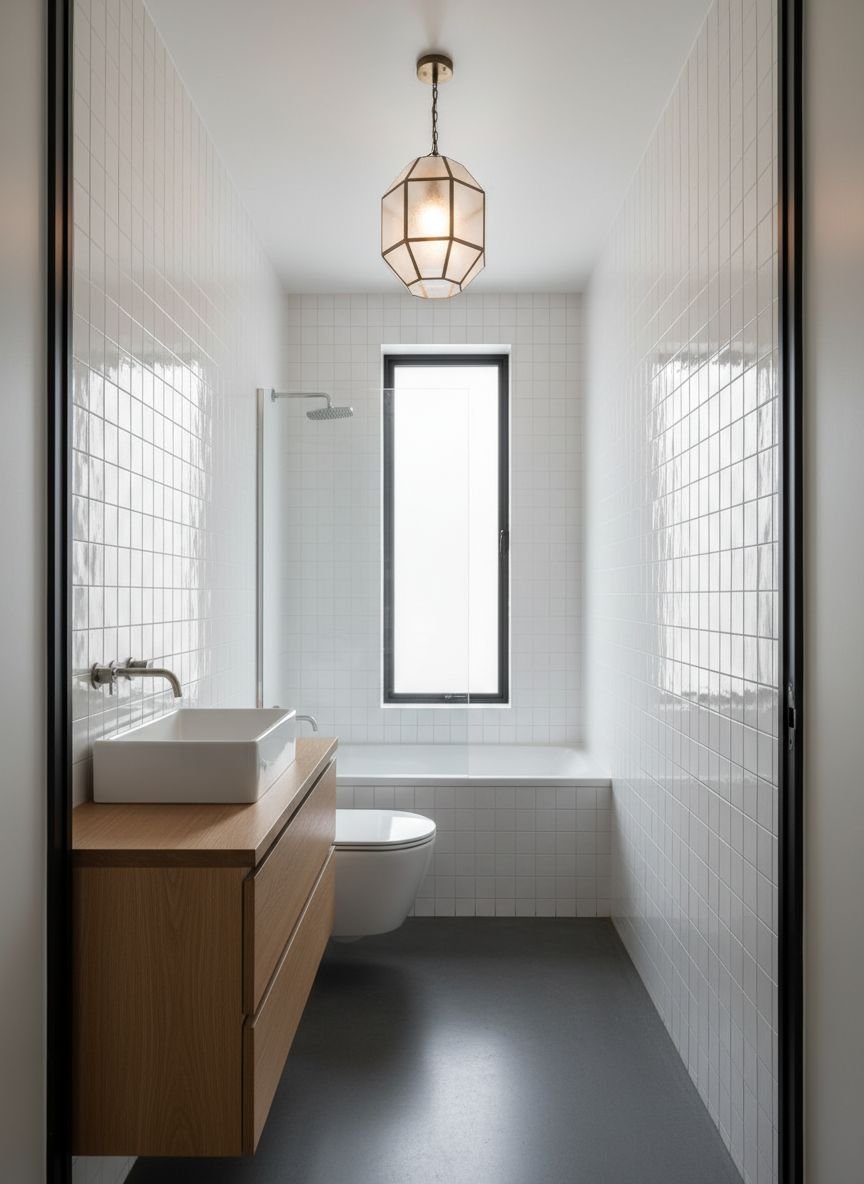
Layer Your Lighting
A single overhead bulb casts harsh shadows that close in the walls. You need a lighting plan that hits three levels. Ambient light provides general illumination. Task light helps you groom at the vanity. Accent light highlights architectural features or decor. Sconces mounted at eye level on either side of the mirror reduce shadows on your face. They also spread light horizontally across the wall width.
Recessed lighting in the shower brightens a typically dark zone. LED strip lighting under a floating vanity creates a soft glow on the floor. This makes the floor area look larger. Dimmers allow you to control the intensity based on the time of day. Bright light expands the space in the morning. Soft light blurs the edges at night. Varied light sources create dimension and push back the walls.
Pro Tip: Choose bulbs with a color temperature of 3000K for a bright but warm light that mimics natural daylight.
Comparison: Paint Finishes for Small Bathrooms
| Finish Type | Light Reflection | Durability | Best Application |
|---|---|---|---|
| Matte | Low | Low | Ceilings (hides imperfections) |
| Eggshell | Medium | Medium | Low traffic walls |
| Satin | High | High | Bathroom walls (resists moisture) |
| Semi Gloss | Very High | Very High | Trim and cabinets |
| High Gloss | Extreme | Extreme | Ceilings or accent features |
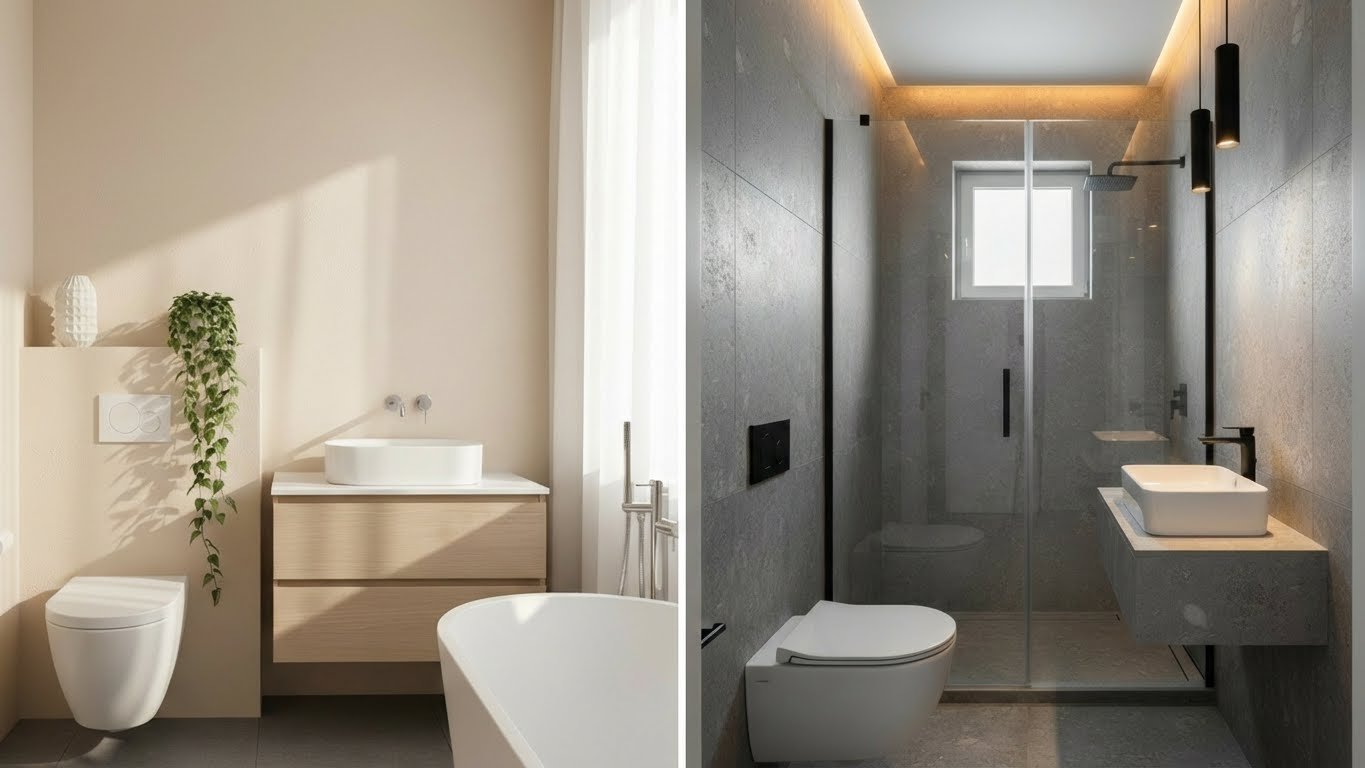
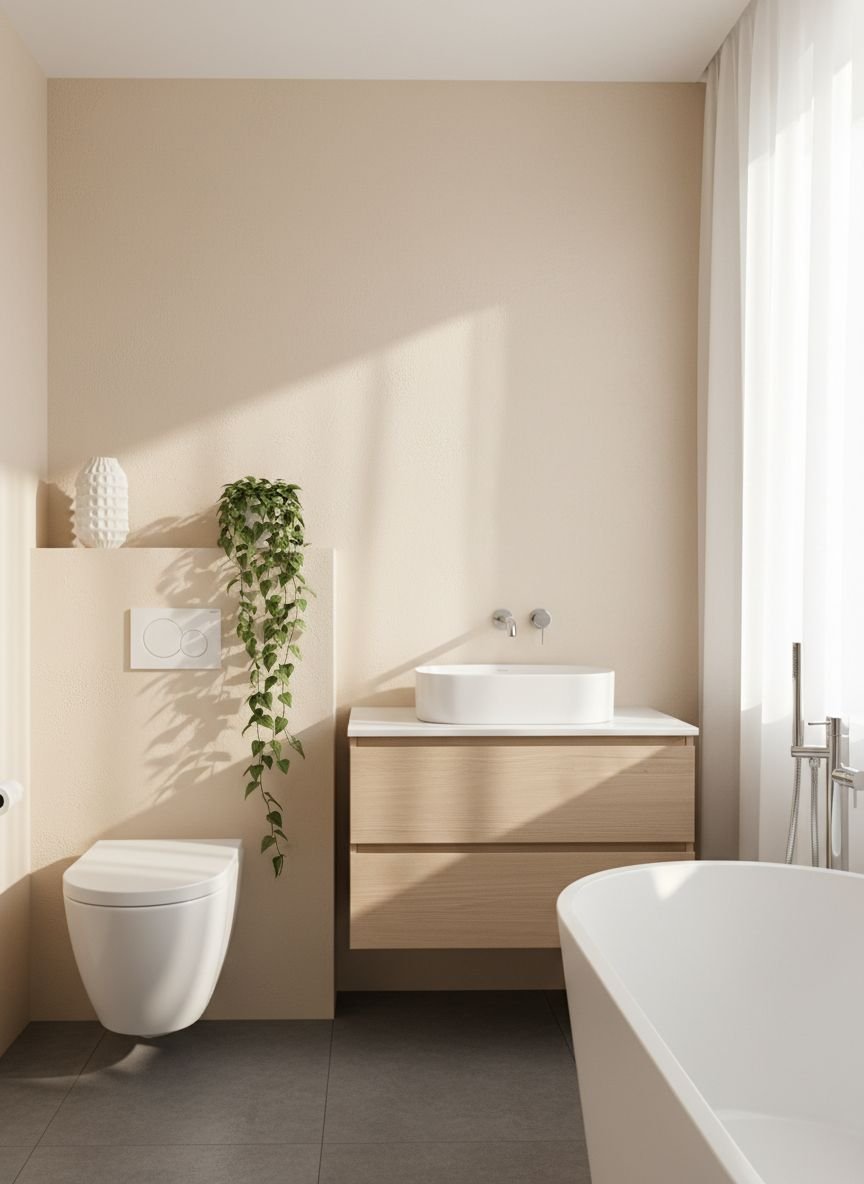
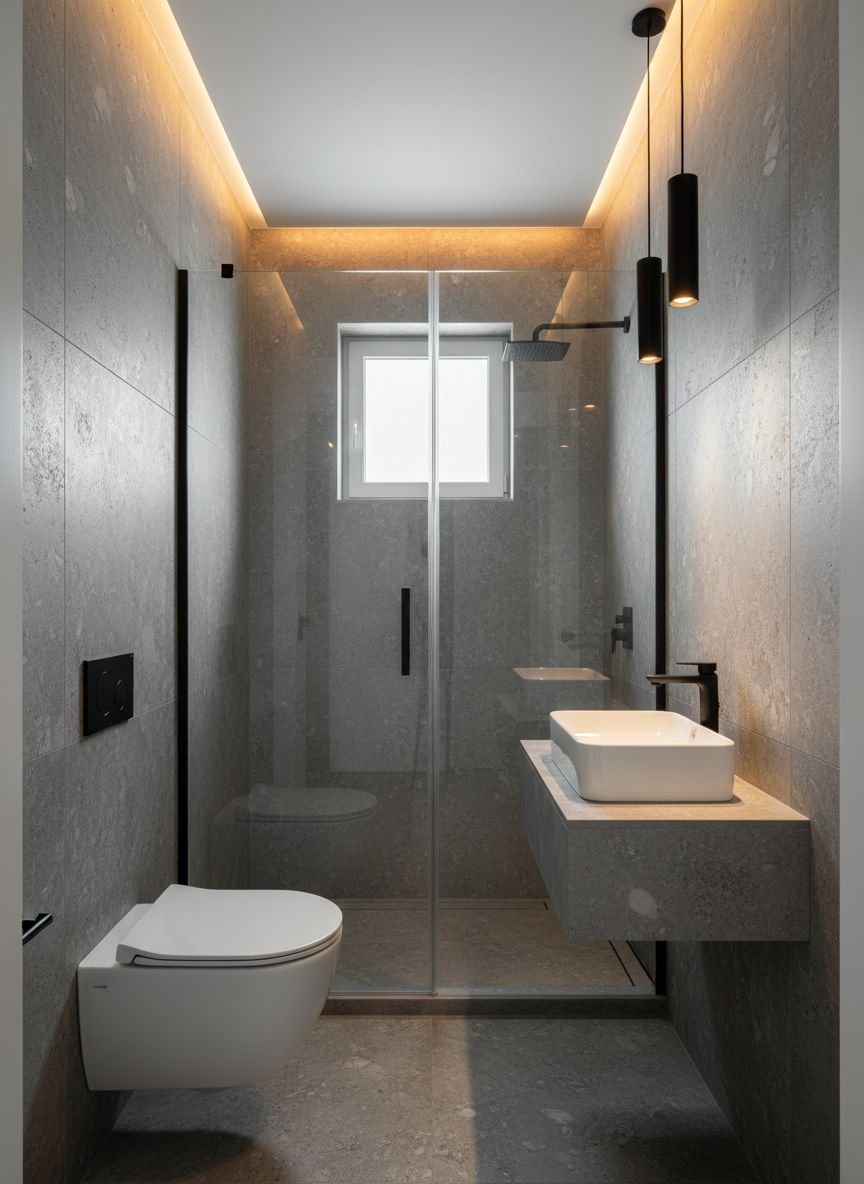
Choose Floating Fixtures for an Open Look
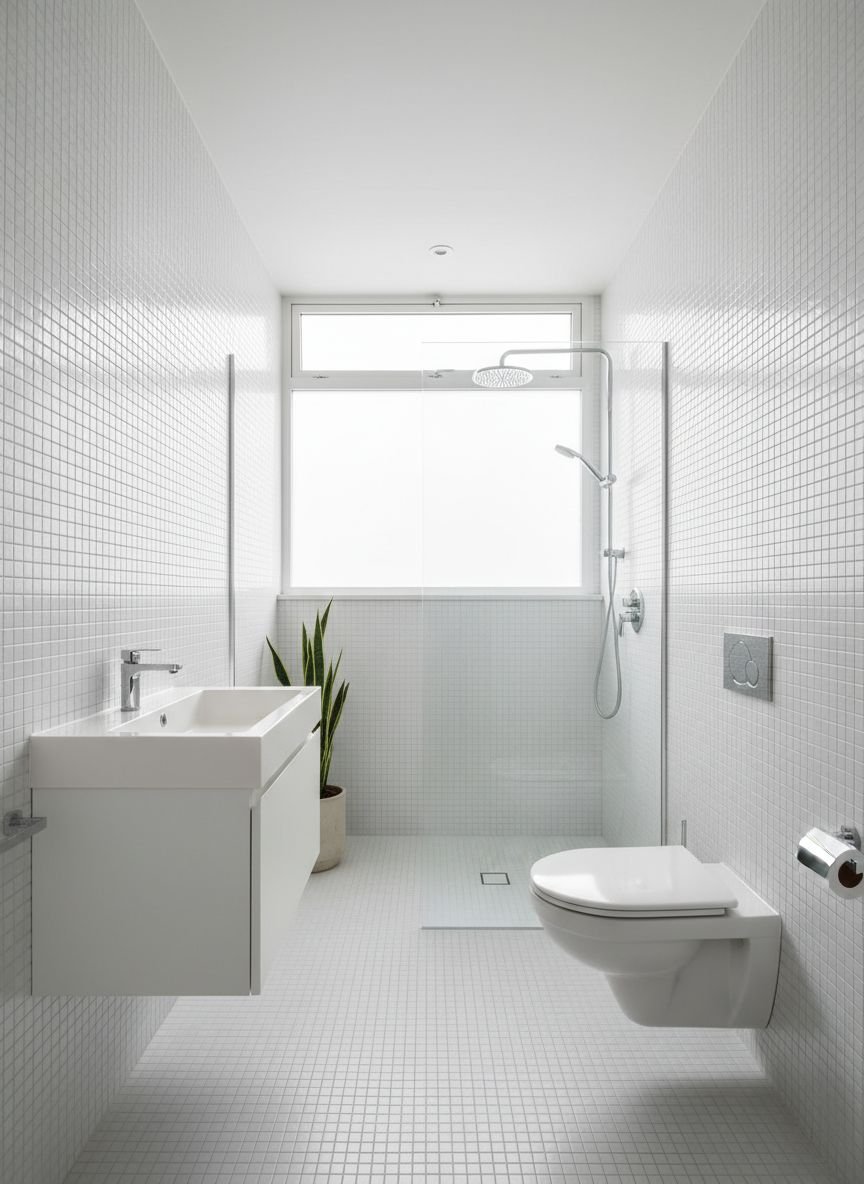
The more floor you see the larger the room feels. Traditional vanities with toe kicks block the line of sight where the wall meets the floor. A floating vanity mounts directly to the wall and leaves the space beneath open. Your eye can travel all the way to the back wall. This unbroken floor plane tricks the brain into perceiving more square footage.
Wall mounted toilets achieve the same effect. The tank is hidden inside the wall and the bowl hovers above the floor. This saves physical space and visual weight. Cleaning becomes significantly easier when you can mop underneath fixtures. The room feels lighter and less grounded. You can use the space under a floating vanity for attractive baskets if you need extra storage.
Pro Tip: Install under vanity lighting to emphasize the open space beneath the cabinet.
Opt for Open Shelving Instead of Bulky Cabinets
Closed cabinets project into the room and create solid blocks that absorb space. Open shelving provides storage without the visual bulk. The depth of the wall remains visible behind the items on the shelf. This transparency maintains the feeling of width. You can use wood or glass shelves depending on your style. Glass shelves are particularly effective as they are nearly invisible.
You must keep open shelves tidy for this to work. Use attractive baskets or glass jars to organize smaller items. Roll towels neatly to create a spa vibe. Do not overstuff the shelves. Leave some negative space between items. This breathing room is essential for the spacious effect. Open shelving forces you to remain organized and prevents the accumulation of unused products.
Save this idea to your Pinterest.
Utilize Vertical Space for Storage
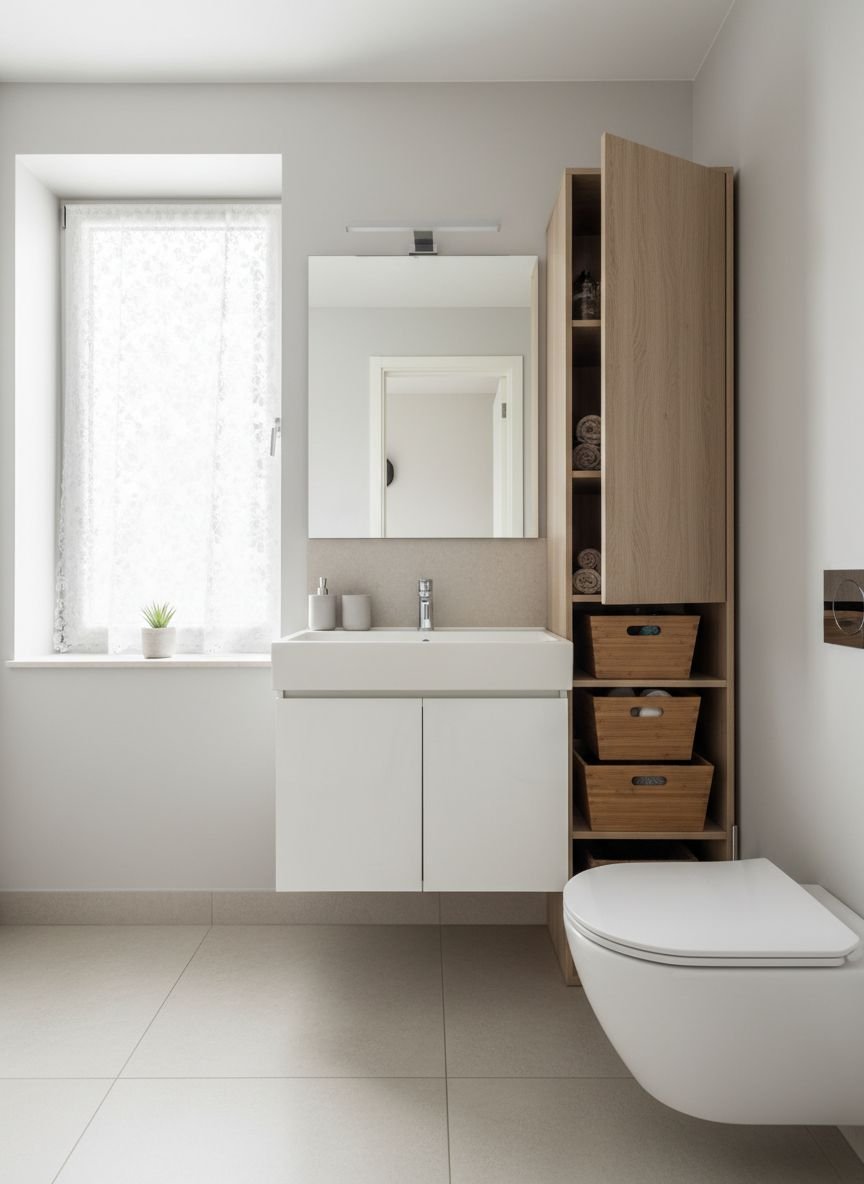
Floor space is premium real estate in a small bathroom. You have abundant space on the walls that often goes unused. Look up for storage solutions. Install shelves above the door frame for towels or extra toilet paper. Use a tall and narrow linen tower that takes up little floor space but offers volume. Ladder shelves lean against the wall and offer tiered storage without bulk.
The area above the toilet is a prime target. A custom cabinet or simple wood shelves here utilizes dead space. Hooks are your best friend for robes and towels. Install a row of hooks instead of a wide towel bar. This accommodates more items in less horizontal width. Drawing the eye upward with vertical storage emphasizes the height of the room. High ceilings or the illusion of them make a small footprint feel grand.
Pro Tip: Use baskets on high shelves to pull down items safely without clutter falling on you.
Select the Right Tiles
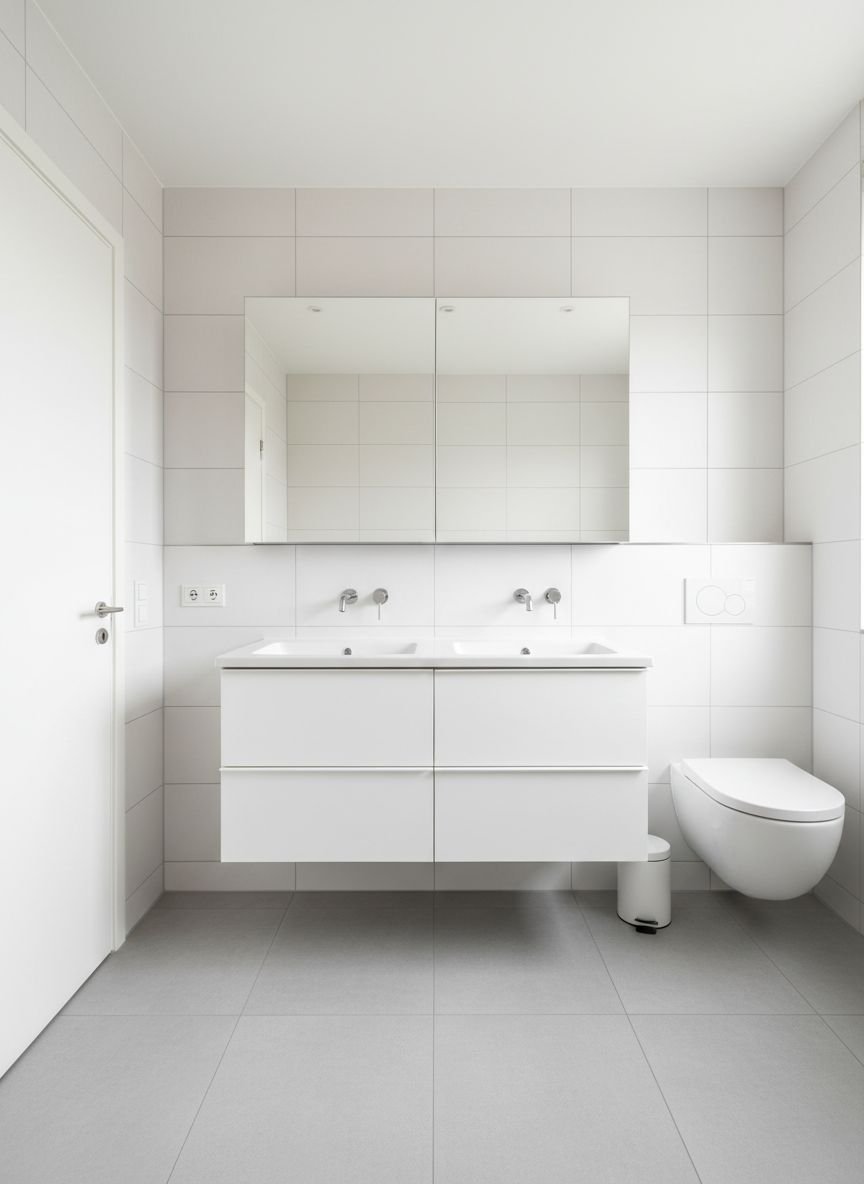
Tile choice impacts the scale of the room dramatically. Tiny mosaic tiles with heavy grout lines can look busy and chaotic. Large format tiles reduce the number of grout lines. This creates a smoother and more cohesive surface. The floor looks like one continuous sheet rather than a grid. Rectangular tiles can be laid to direct the eye.
Lay rectangular tiles horizontally to make the room look wider. Lay them vertically to make the ceiling look higher. Match the grout color to the tile color. High contrast grout highlights the grid and chops up the space. Low contrast grout blends the tiles together. Continue the floor tile into the shower to create a seamless look. This unity prevents the floor plan from being visually divided into small zones.
Pro Tip: Choose rectified tiles for the thinnest possible grout lines to enhance the seamless effect.
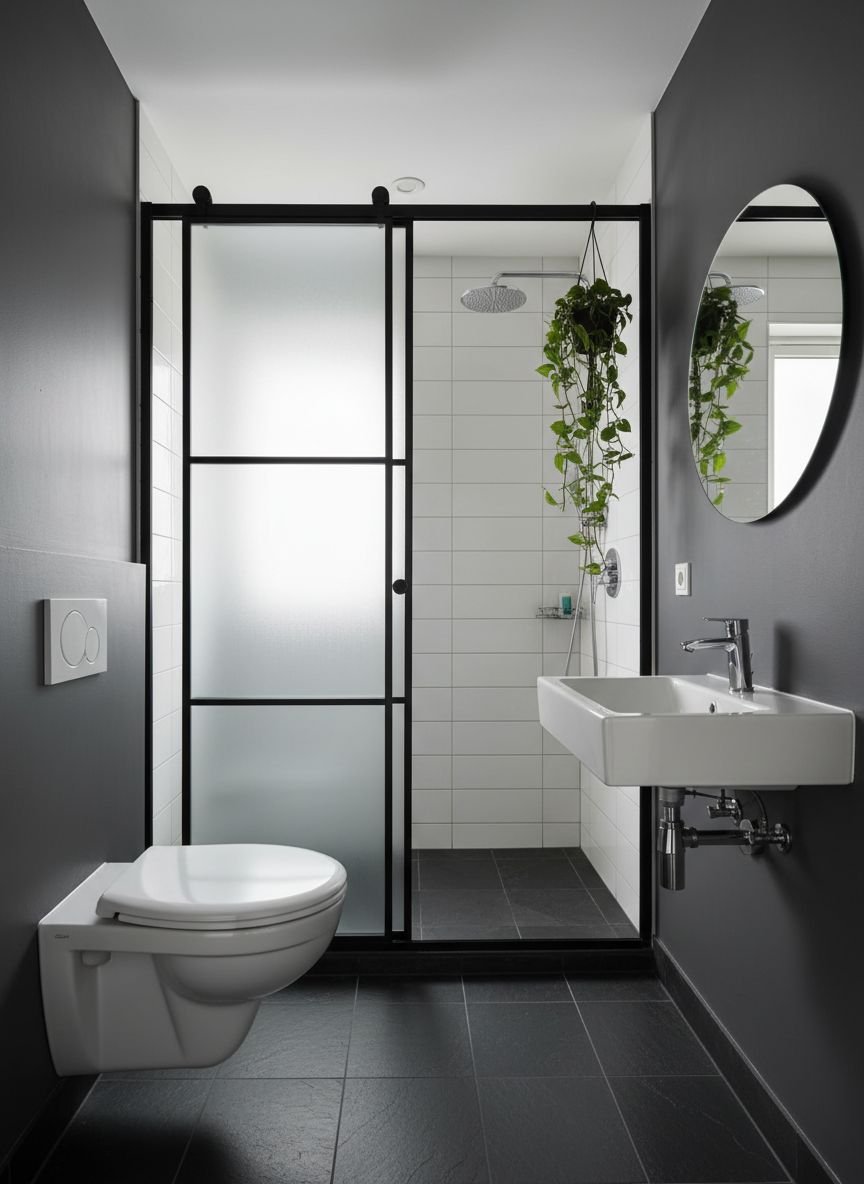
Use a Glass Shower Enclosure
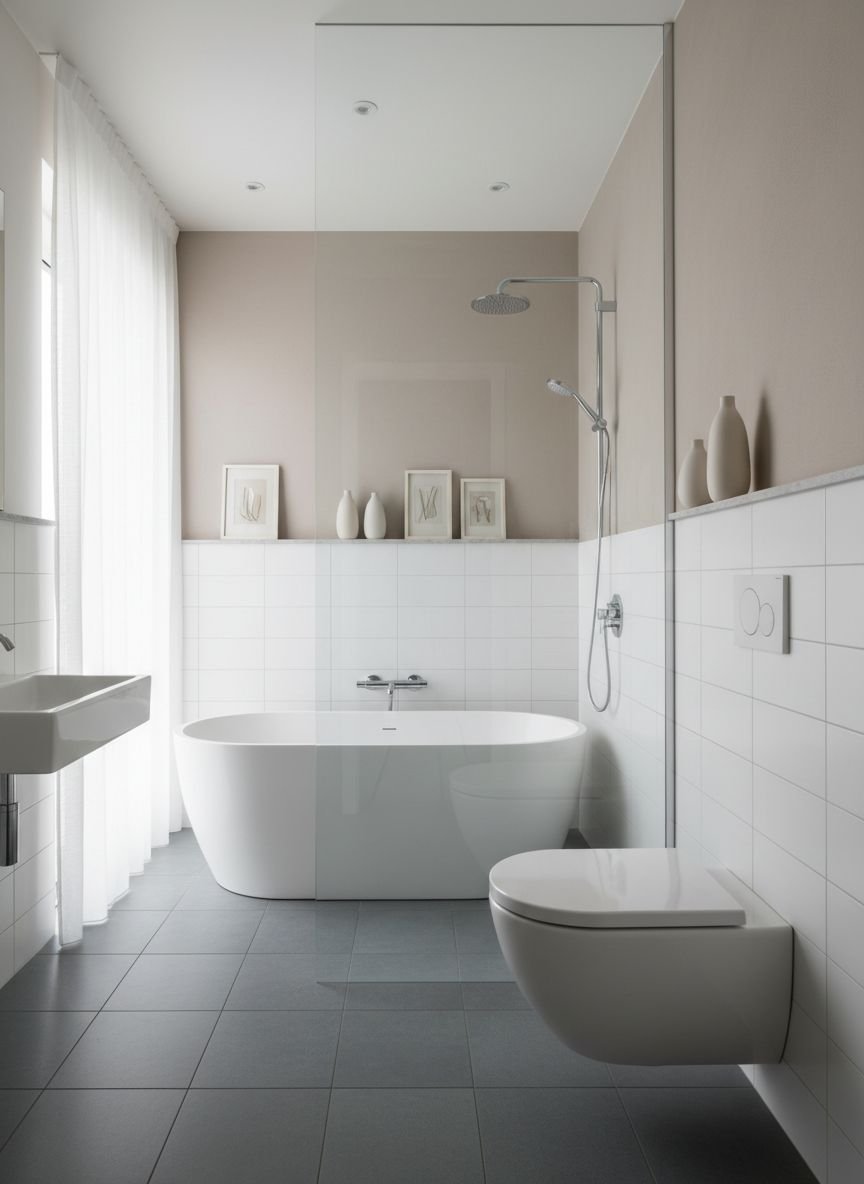
A shower curtain creates a wall that cuts the bathroom in half. You lose a significant portion of the room’s visual depth. A clear glass enclosure removes this barrier entirely. You can see the back wall of the shower from the doorway. The entire volume of the room is visible at once. Frameless glass is the best option as it lacks heavy metal borders.
If you prefer a tub the same rule applies. Use a glass panel instead of a curtain. If you must use a curtain choose a clear liner or pull the curtain all the way back when not in use. Textured glass creates privacy but still allows light to pass. The goal is to eliminate opaque dividers. A glass enclosure showcases beautiful tile work inside the shower as well.
Get The Look: Spacious Bathroom Essentials
- Floating Vanity: Look for wall mounted units in light wood or white lacquer.
- Frameless Glass Door: Custom or kit options available at hardware stores.
- Large Format Tile: 12×24 inch tiles in marble or concrete look.
- Satin Paint: Bright White or Chantilly Lace for maximum reflection.
- LED Mirror: Backlit mirrors eliminate the need for bulky vanity lights.
Vertical Stripes for Height and Elegance
Stripes are a classic optical illusion. Vertical stripes draw the eye up and down. This makes low ceilings feel loftier. You can achieve this with wallpaper or paint. A subtle tone on tone stripe adds texture without overwhelming the room. High contrast black and white stripes make a bold statement that distracts from the size.
You can also use beadboard or shiplap installed vertically. The grooves act as lines that guide the eye upward. Even the shower tile can be arranged in vertical stacks. This linear movement creates a sense of elegance and lift. It counters the boxy feeling of a square room. Vertical elements give the architecture a sense of purpose and grandeur.
Pro Tip: Keep the stripes thin to medium width; overly wide stripes can sometimes make a wall look shorter.
Sliding Doors: A Space-Saving Upgrade
A traditional swinging door requires a clearance arc. This dead space cannot be used for anything else. You cannot place a cabinet or hamper behind the door. A sliding door or pocket door reclaims this floor space. The door slides into the wall or along it. You instantly gain several square feet of usable room.
Barn doors are a popular surface mounted option. They add character and slide along an exposed track. Pocket doors are more invasive to install but disappear completely. This makes the bathroom feel integrated with the adjoining room when open. The removal of the door swing allows for better flow. You no longer have to squeeze around the door to reach the sink.
Save this idea to your Pinterest.
Right-Sized Fixtures for Maximum Efficiency
Standard fixtures overpower a petite bathroom. You need scale appropriate pieces. A round bowl toilet extends less into the room than an elongated bowl. A narrow pedestal sink or a corner sink frees up floor space. You do not need a massive vanity to have a functional bathroom. Compact fixtures provide necessary function without domination.
Look for shallow depth cabinets. Standard depth is 21 inches but 18 inch options exist. That three inch difference is noticeable in a tight walkway. A smaller bathtub or a dedicated shower stall fits better than a standard tub. Every inch creates better circulation paths. Proper scale ensures the room feels balanced rather than stuffed.
Pro Tip: Measure your walkway clearance; aim for at least 24 inches of clear space in front of the toilet and sink.
Translucent Partitions for Open Privacy
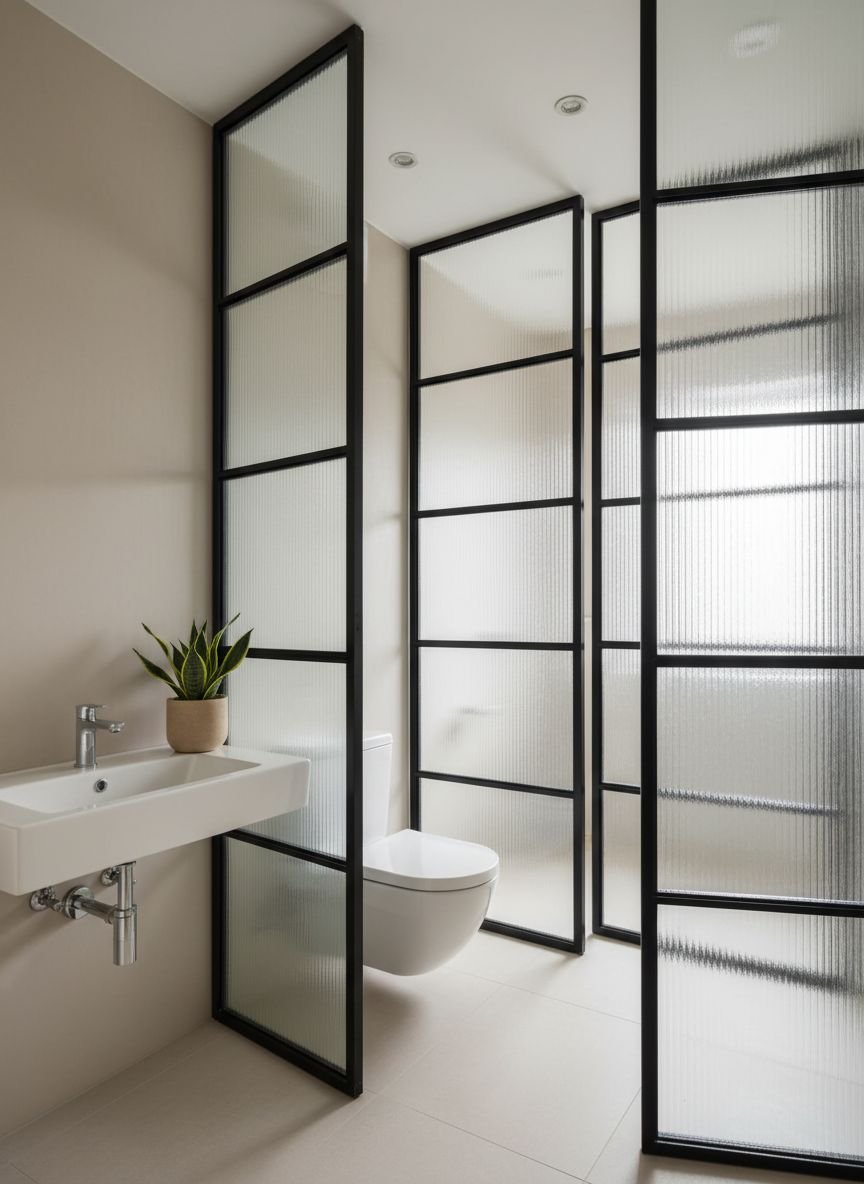
Sometimes you need separation for the toilet or storage areas. Solid walls block light and close in the space. Translucent materials offer a compromise. Fluted glass or frosted acrylic screens blur the view without blocking light. You get the privacy you need without the visual weight of drywall.
These partitions work well to separate the shower from the vanity. They also work as modesty panels for the toilet. The light passes through to keep the corners bright. The texture of the glass adds a design element. It feels modern and intentional. Translucent dividers maintain the open concept feel while defining zones.
Related posts :
- 15 Stunning Living Room Designs for Small Spaces That Maximize Every Inch
- 13 Chic Ways to Create a Vanity Nook in a Small Bedroom (Zero Clutter)
- 15 Best Corner Plant Stand Ideas for Cozy and Stylish Spaces That Maximize Every Inch
A Statement Piece to Command Attention
It sounds counterintuitive to add something bold to a small space. However a single focal point distracts from the size. A stunning piece of art or a unique light fixture grabs the eye immediately. The viewer focuses on the design element rather than the proximity of the walls.
A patterned floor tile can serve as this statement. Keep the walls neutral and let the floor sing. An antique mirror or a vessel sink can also work. The key is to pick one hero piece. Too many statements create clutter. One bold choice shows confidence. It tells the story that the small size is a choice rather than a limitation.
Pro Tip: Ensure your statement piece is scaled correctly; a large chandelier might be too much, but a unique pendant is perfect.
Popular Asked Questions
What colors make a small bathroom look bigger?
White and bright colors are best for expanding a room. Soft grays, creams, and pastels reflect light which pushes the walls outward visually. You should avoid dark colors on all four walls as they absorb light and make the room feel smaller.
Is a walk-in shower better for a small bathroom?
Yes. A walk-in shower usually takes up less space than a bathtub. It also removes the visual bulk of the tub wall. Using a glass enclosure allows you to see the full depth of the room which makes it feel much larger.
How can I add storage without cluttering a small bathroom?
Use vertical space. Install shelves over the toilet or door. Use a recessed medicine cabinet to hide items inside the wall. Floating vanities with drawers are better than pedestal sinks if you need storage. Baskets on open shelves keep small items organized.
Do large tiles make a small bathroom look smaller?
No. Large tiles actually make a small bathroom look bigger. They require fewer grout lines which creates a less cluttered visual. The floor looks like one seamless surface rather than a busy grid.
Conclusion
Small bathrooms hold immense potential for style and functionality. You do not need to knock down walls to create a spacious feel. Strategic lighting and smart material choices transform the perception of the room. The right fixtures and storage solutions reclaim lost space.


Leave a Comment