
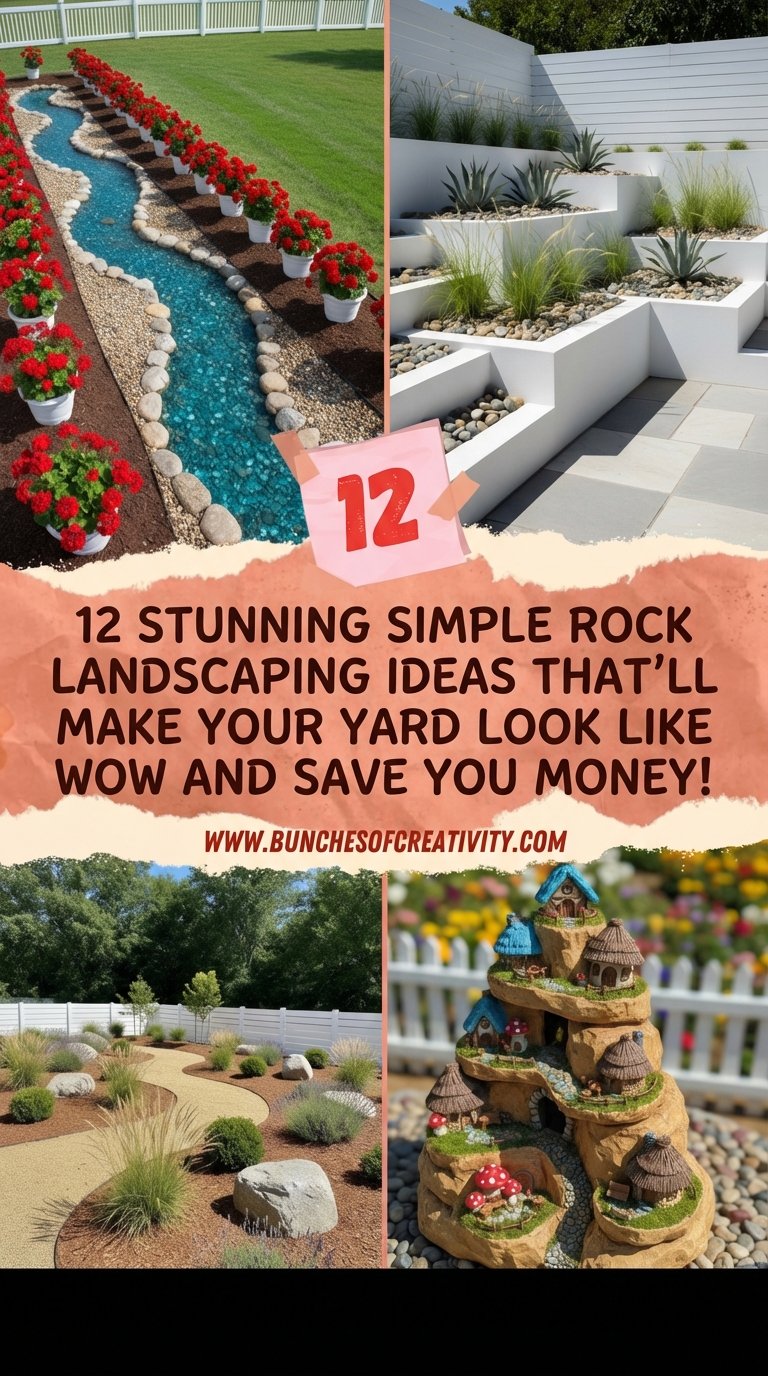
Are you tired of spending your entire weekend mowing, weeding, and fighting a losing battle against your lawn? You are not alone. The trend is shifting away from high-maintenance grass and toward “hardscaping” that looks expensive but actually saves you time. Simple rock landscaping is the ultimate hack for homeowners who want curb appeal without the sweat equity.
Using stone in your garden does more than just look good. It solves major drainage issues, reduces water bills, and creates a permanent structure that survives every season. Whether you have a tiny side yard or a sprawling estate, adding rock features instantly modernizes your space.
In this guide, we break down 12 simple rock landscaping ideas that turn a boring patch of grass into a magazine-worthy sanctuary. We cover everything from river rock dry creek beds to modern crushed granite patios.
Key Takeaways
- Low Maintenance: Rock gardens significantly reduce the need for watering and mowing.
- Cost-Effective: While the initial cost is higher than mulch, rocks last indefinitely and do not need annual replacement.
- Drainage Solutions: River rocks and gravel beds are excellent for directing rainwater away from your foundation.
- Versatility: From Zen gardens to modern minimalist borders, stone fits every aesthetic.
- Weed Control: When paired with high-quality landscape fabric, rock beds suppress weeds better than bare soil.
Table of Contents
- Curved Stone Pathways
- Protective Rock Beds
- Succulent Friendly Rock Gardens
- Zen Garden Vibes
- Mixing Gravel Colors
- Stacked Stone Borders
- Mossy Boulders
- Colorful Agate Slices
- Tiny Fairy Garden Spaces
- Crushed Granite Paths
- Elevated Rock Garden Beds
- Reflective River Glass
- Related Posts
- Popular Asked Questions
- Conclusion
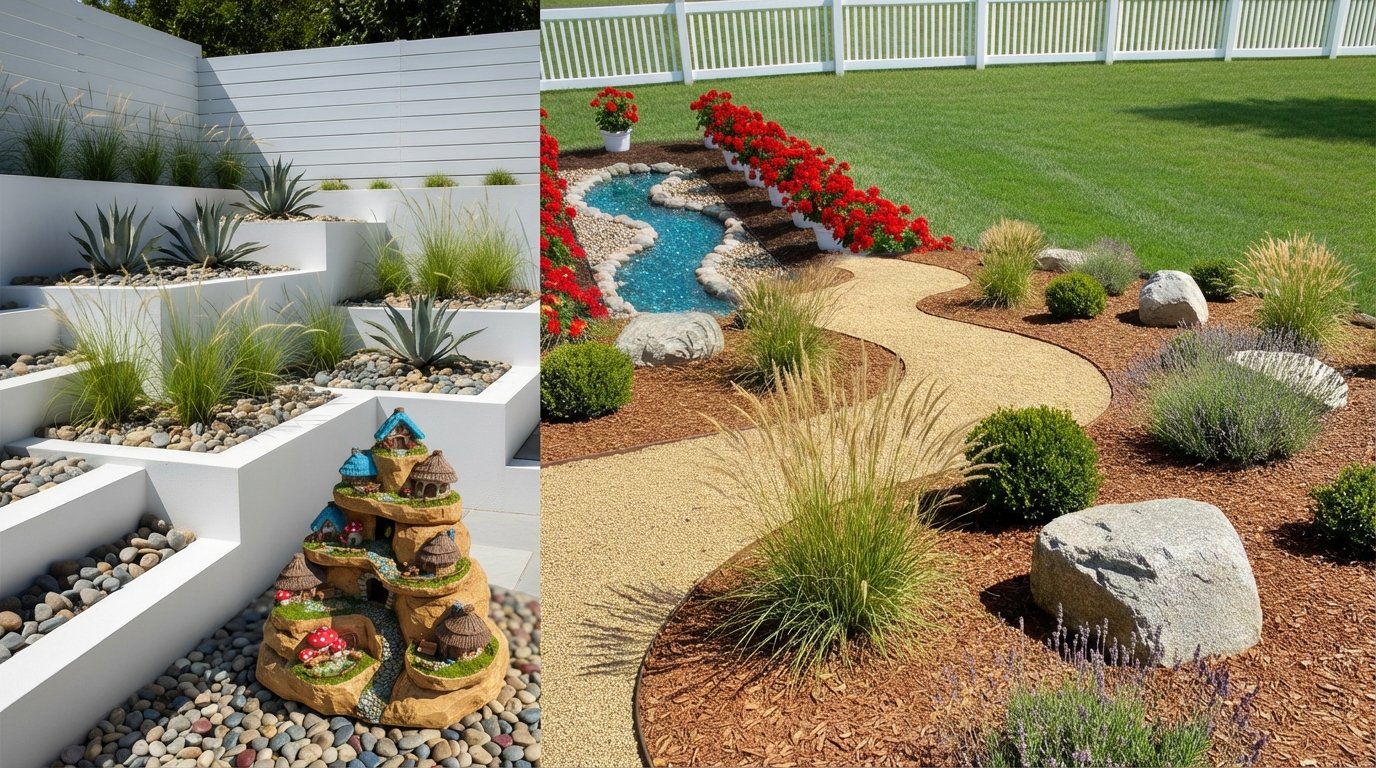
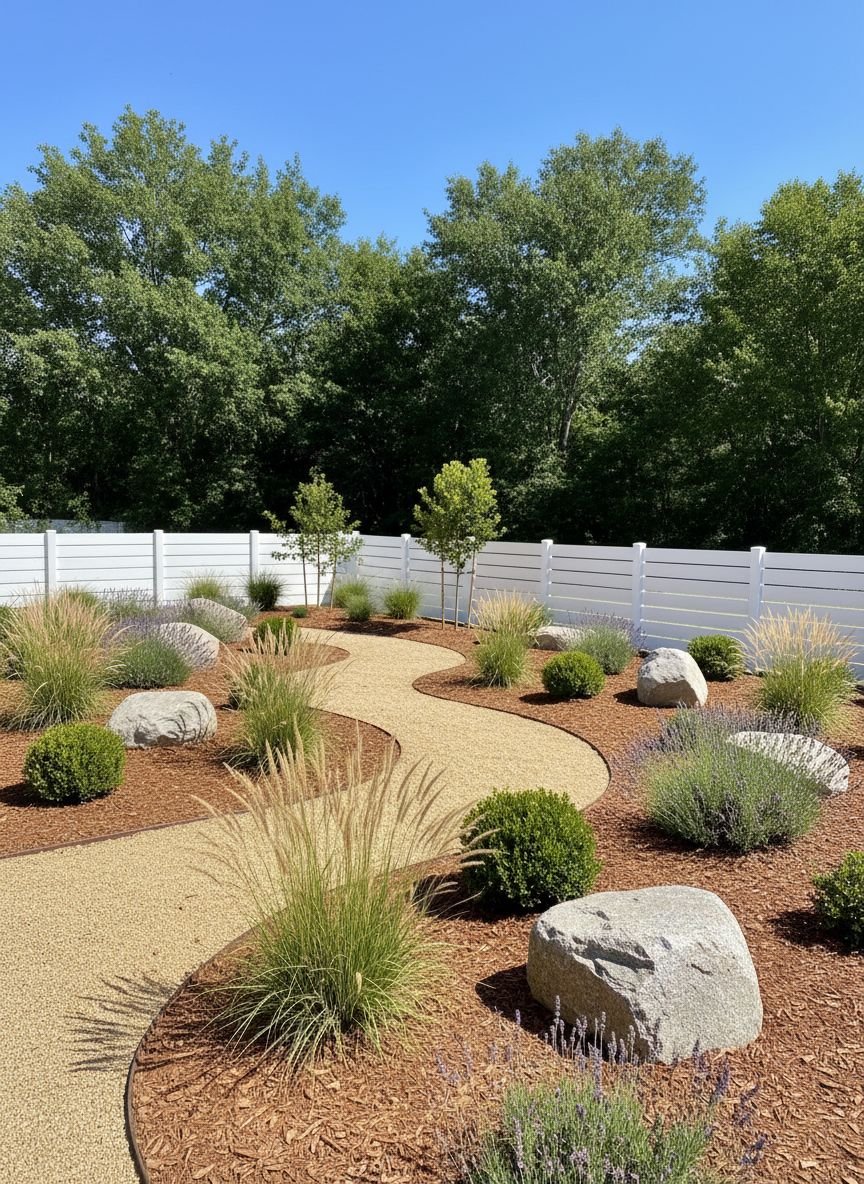
Curved stone pathways that guide guests like a gentle river of rocks
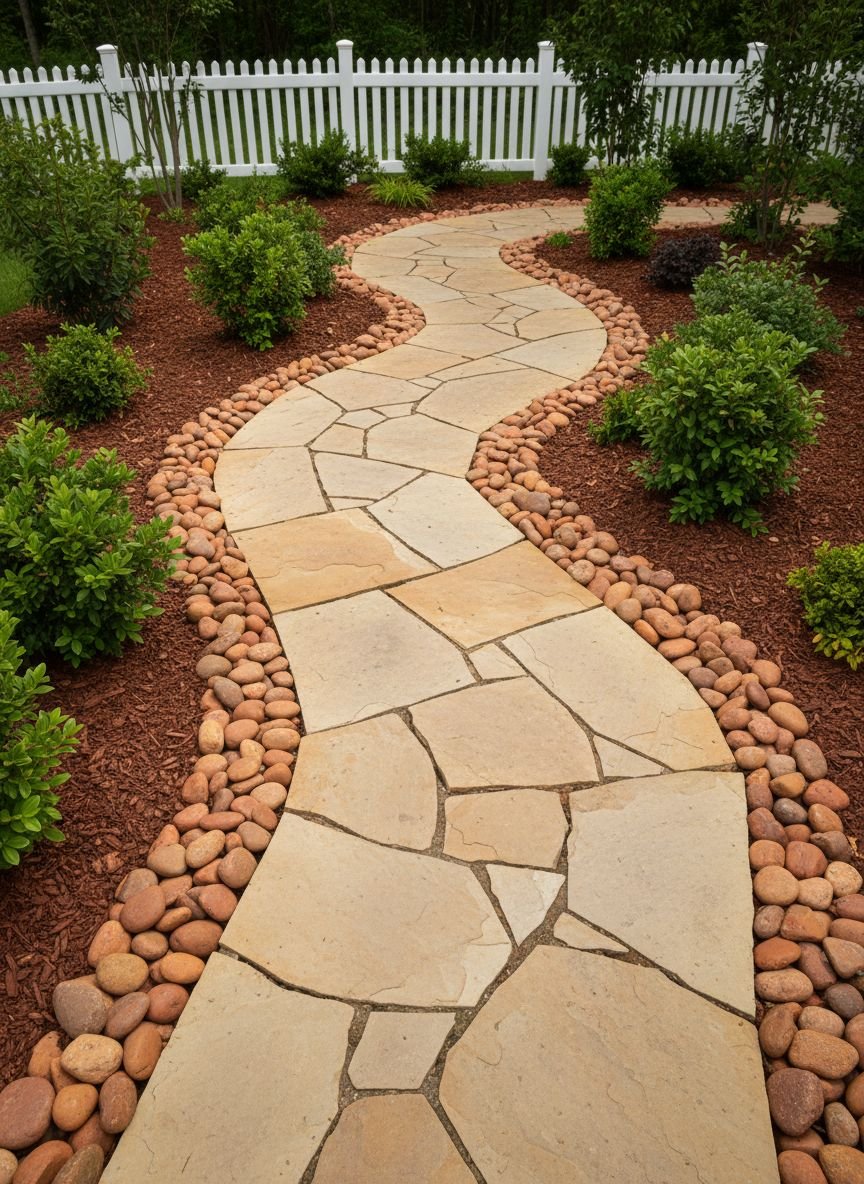
A curved pathway does more than connect point A to point B. It creates a sense of mystery and makes small yards feel larger by obscuring the destination. Using smooth river stones or flat flagstones arranged in a winding pattern mimics the natural flow of water. This organic shape softens the harsh lines of modern architecture and square property lots.
To achieve this look, avoid straight lines entirely. Use a garden hose to lay out your path shape before digging. For the materials, contrasting textures work best. Place large, flat stepping stones down first, then fill the gaps with smaller pea gravel or river rocks. The contrast between the stable, large stones and the loose, small rocks adds a satisfying visual crunch and keeps the path permeable for rain.
Pro Tip: Install flexible metal or plastic edging along the sides of your path to keep the rocks from migrating into your grass or flower beds.
Protective rock beds circling your trees to keep weeds on the naughty list
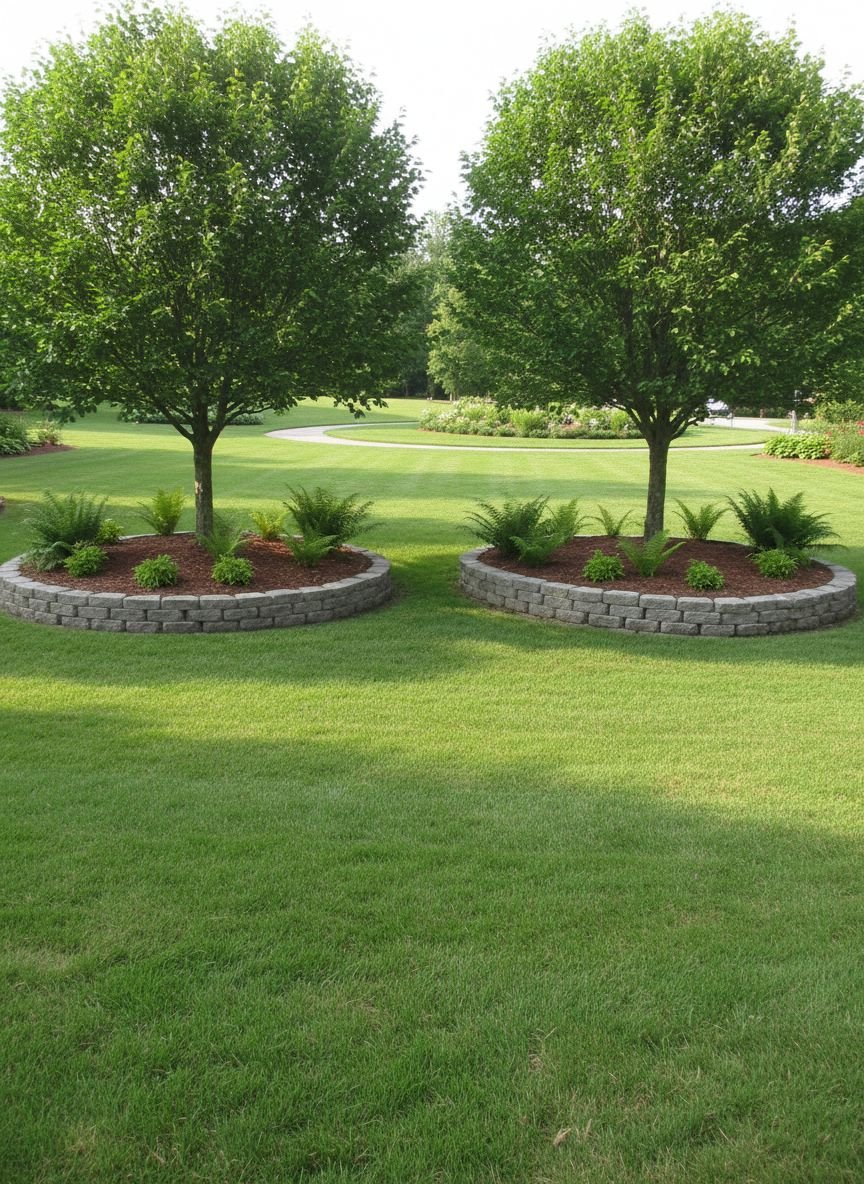
Grass rarely grows well under large trees due to shade and root competition. Instead of fighting patchy grass, create a clean rock circle around the base of the tree. This “tree ring” serves a dual purpose: it protects the tree trunk from lawnmower damage and creates a polished, intentional look.
Visually, this technique anchors the tree to the landscape. Use medium-sized stones (1-3 inches) rather than fine gravel, as they are less likely to be blown away by leaf blowers during fall cleanup. Darker rocks like black lava rock or grey river stones create a beautiful contrast against the brown tree bark and green foliage. Ensure you leave a few inches of clearance directly around the trunk to prevent moisture rot.
Pro Tip: Lay down a permeable landscape fabric before placing the rocks to stop weeds from poking through while allowing water to reach the tree roots.
Succulent-friendly rock gardens for when you want plants that low-key chill
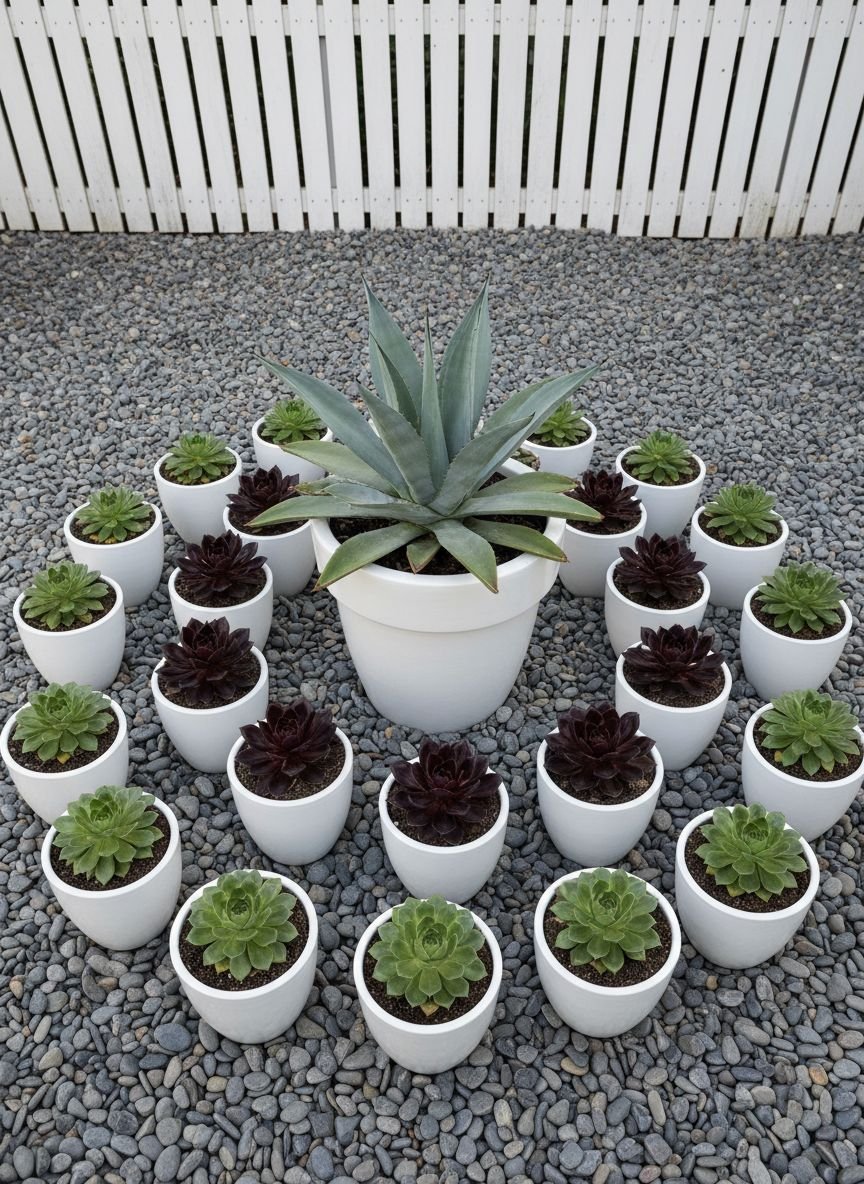
If you live in a drought-prone area or simply forget to water your plants, a succulent rock garden is your best friend. Succulents and rocks are a natural pairing because they both thrive in dry, well-draining environments. The stones absorb heat during the day and radiate it at night, creating the perfect microclimate for plants like agave, sedum, and echeveria.
Design this space by mounding soil to create height and visual interest. Place larger boulders as “anchor” points and plant your succulents in the crevices between them. Fill the remaining ground with a top dressing of decorative gravel. The gravel keeps the leaves of the succulents off the damp soil, which prevents rot. This setup creates a desert-chic aesthetic that looks stunning year-round with almost zero effort.
Pro Tip: Choose gravel colors that contrast with your plants. White stones make green succulents pop, while red lava rocks complement blue-toned plants.
Zen garden vibes with smooth pebbles and a raked sand canvas
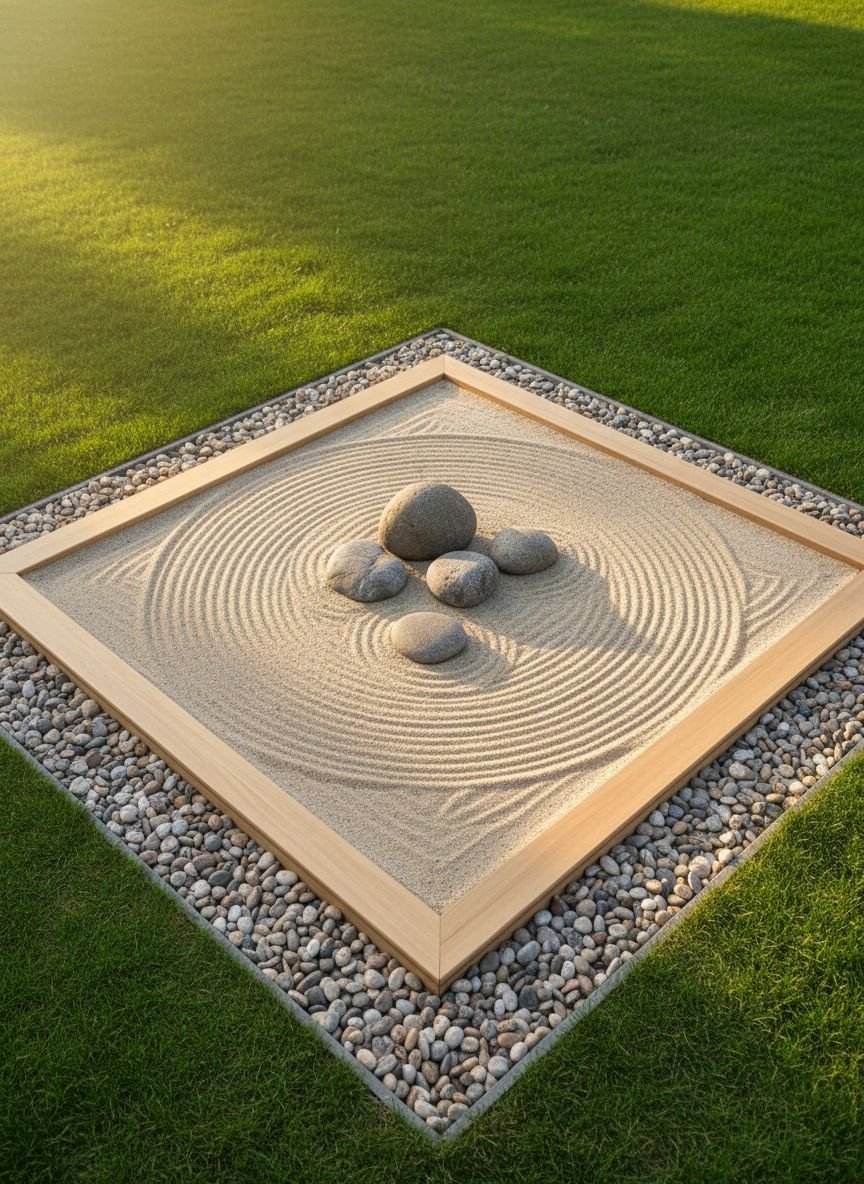
A Zen garden is not just a landscaping style. It is a tool for mindfulness. The core design principle here is minimalism and symbolism. White sand or fine crushed granite represents water, while carefully placed larger rocks represent islands or mountains. The act of raking patterns into the sand is intended to be a meditative practice.
To build this in your own yard, you do not need a massive space. A small, rectangular corner is sufficient. Use a high-quality weed barrier at the bottom to prevent soil mixing. Select rocks with interesting shapes and weather-worn textures. Odd numbers of rocks (groups of three or five) are traditionally more aesthetically pleasing in this style. The negative space is just as important as the features, so do not overcrowd the area.
Pro Tip: Keep a specialized wooden rake nearby so you can smooth out the surface and create new ripple designs whenever you need a moment of peace.
Mixing gravel colors to create a natural watercolor painting on your lawn
Who says rocks have to be gray? Mixing different colors and sizes of gravel allows you to “paint” patterns on the ground. This technique works incredibly well for large, open areas where grass is impractical. You can create swirls, waves, or geometric shapes by separating different colored stones with invisible edging.
For a subtle look, mix shades of beige, tan, and cream for a sandy beach effect. For high drama, contrast white marble chips with dark grey slate chips. The texture difference is also key here. Combine smooth river rocks with jagged crushed stone to catch the light differently. This approach turns the ground itself into a piece of art, requiring no plants to make a statement.
Pro Tip: Use a steel garden rake to blend the transition zones slightly if you want a gradient effect, or use rigid edging for crisp, modern lines.
Save this idea to your Pinterest.
Comparison: Gravel Types for Your Yard
| Gravel Type | Best For | Pros | Cons |
|---|---|---|---|
| Pea Gravel | Pathways, Patios | Soft underfoot, inexpensive | Moves easily, hard to shovel snow |
| River Rock | Drainage, Borders | Stays in place, great drainage | Hard to walk on, expensive |
| Crushed Granite | Modern Paths | Packs down firm, stable | Sharp edges, can track indoors |
| Lava Rock | Weed Barriers | Lightweight, bold color | Floats in heavy rain, rough texture |
Stacked stone borders that double as casual seating during BBQs
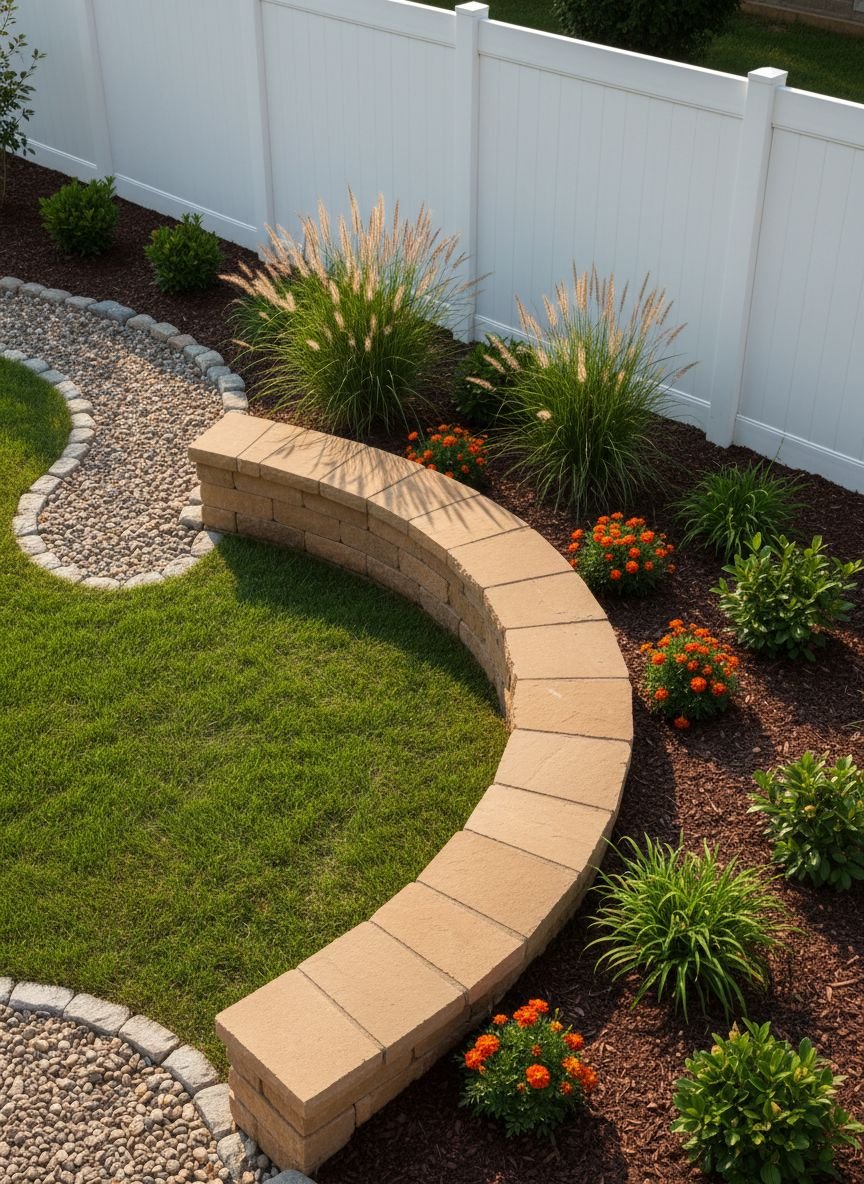
A low, stacked stone wall is a multitasking genius in landscape design. It acts as a retaining wall to hold back soil in raised beds, defines the border of your patio, and provides extra seating when you have a house full of guests. This is “functional hardscaping” at its finest.
Dry-stacking flat fieldstones or slate gives a rustic, cottage-garden feel. For a cleaner look, use cut limestone or manufactured garden wall blocks. The key is to build the wall at a comfortable sitting height, usually between 18 and 24 inches. Cap the top of the wall with smooth, flat stones so it is comfortable to sit on. This eliminates the need for folding chairs and integrates social space directly into the garden architecture.
Pro Tip: Use construction adhesive between the top two layers of stone to ensure they do not wobble when guests sit down.
Mossy boulders nestled between ferns for that enchanted forest feel
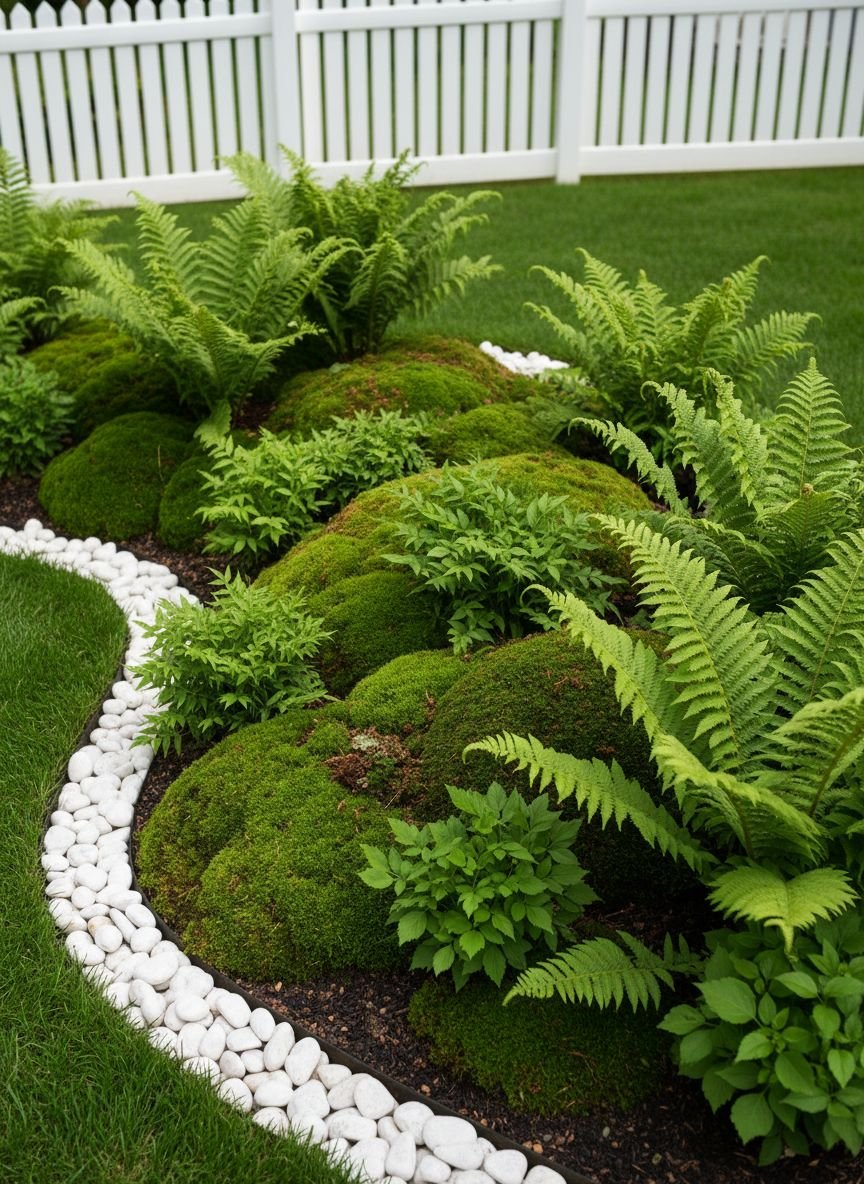
If your yard is shady and damp, embrace it. Instead of fighting for sun, create a lush, woodland rock garden. Large, moss-covered boulders look like they have been there for centuries. This style relies on the “soft” texture of ferns, hostas, and moss contrasting with the “hard” weight of the boulders.
To replicate this, bury the bottom third of your boulders. A rock sitting on top of the grass looks like it was dropped there; a buried rock looks like it grew there. Group rocks in irregular clusters. If you cannot find mossy rocks, you can encourage moss growth by painting the rocks with a mixture of buttermilk and moss spores, then keeping them misted and shaded.
Pro Tip: Plant ferns directly at the base of the boulders so the fronds drape over the stone, softening the edges.
Colorful agate slices embedded in garden walls for secret sparkle moments
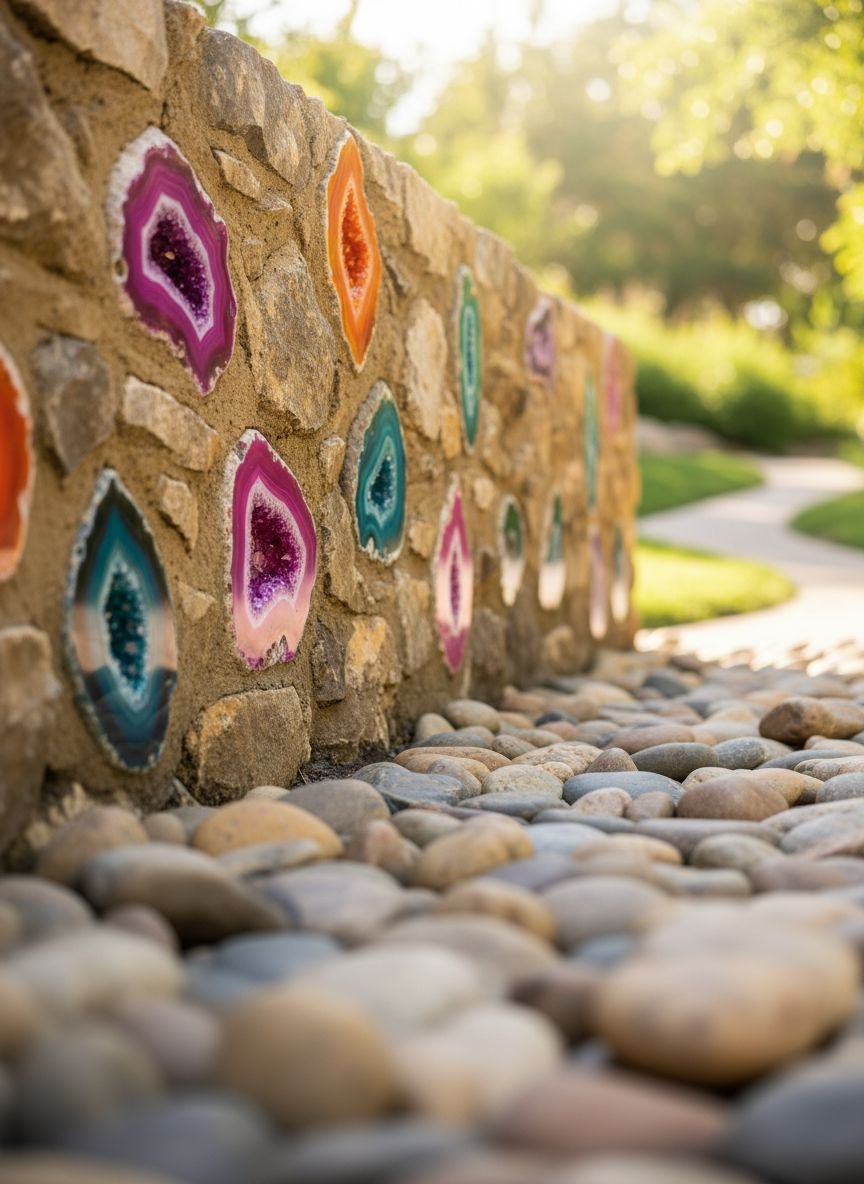
This idea adds a touch of magic and luxury that catches the sunlight. Embedding translucent agate slices or geodes into a concrete or stone wall creates “stained glass” effects in your garden. When the sun hits these stones from behind or above, they glow with vibrant blues, purples, and ambers.
This is a perfect DIY project for a boring retaining wall or a concrete stepping stone path. You can adhere the agate slices using outdoor-rated masonry adhesive or press them into wet mortar during construction. It is a small detail that might go unnoticed at a glance, but it delights anyone who stops to look closer. It elevates a standard rock project into a custom art installation.
Pro Tip: Position these features on west-facing walls to catch the golden hour sunset light for maximum glow.
Tiny fairy garden spaces tucked into rock crevices to unleash childlike wonder
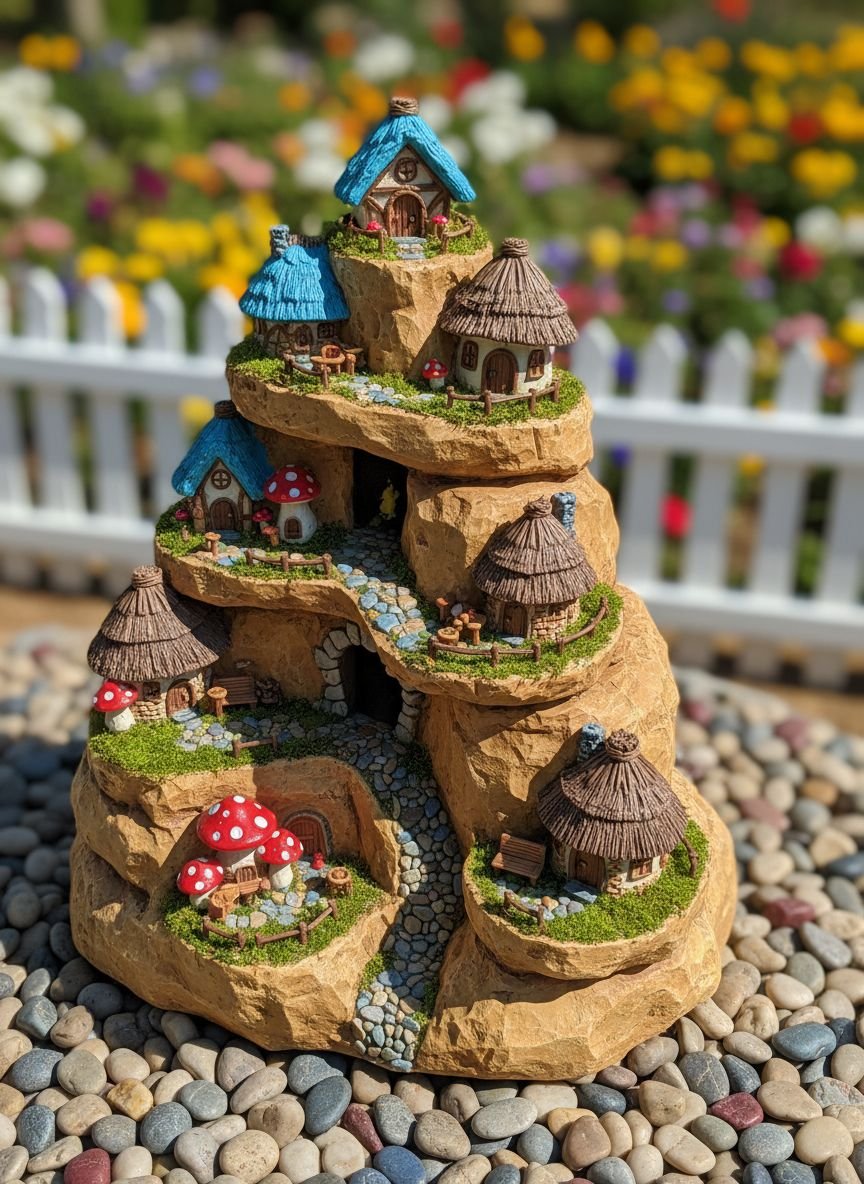
Rock gardens naturally create small nooks and crannies that are perfect for miniature landscapes. A “fairy garden” uses these small spaces to create a sense of scale and whimsy. It is a fantastic way to get children involved in gardening, but it can also be done in a sophisticated way for adults.
Use a hollow in a large rock or the space between two boulders. Plant tiny ground covers like creeping thyme or Irish moss to simulate grass. Add miniature succulents to look like trees. Small pebbles can act as pathways. The goal is to create a tiny world that rewards careful observation. It breaks up the monotony of a large rock wall and adds personality.
Pro Tip: Use natural materials for any “furniture” or accessories—twigs, acorn caps, and bark—to keep the look organic rather than plastic and tacky.
Crushed granite paths that lead you to your happy place
Decomposed granite (DG) or crushed stone is the gold standard for modern, minimalist pathways. Unlike round pea gravel, crushed stone has jagged edges that lock together when compacted. This creates a surface that is firm enough to roll a wheelchair or stroller over, yet still permeable to water.
This material creates a clean, architectural look often seen in high-end desert resorts or French courtyards. It is available in various colors, from warm golds to cool grays. To install, you need a base layer of road base, followed by the crushed granite. It must be tamped down or vibrated with a plate compactor to achieve that solid, professional finish.
Pro Tip: Install a “stabilizer” binder mixed into the granite. This acts like a weak glue, preventing the path from getting muddy or washing away in heavy rain.
Get The Look: Rock Landscaping Essentials
- Heavy Duty Weed Barrier: Do not buy the cheap stuff. Get the commercial-grade woven fabric.
- Steel Rake: Essential for spreading gravel evenly.
- Edging: Steel or aluminum edging keeps rocks contained and lines crisp.
- Tamper: A hand tamper is needed to flatten soil and crush stone paths.
- Leaf Blower: The only easy way to clean leaves off a rock garden.
Elevated rock garden beds for lazy plant caretakers like us
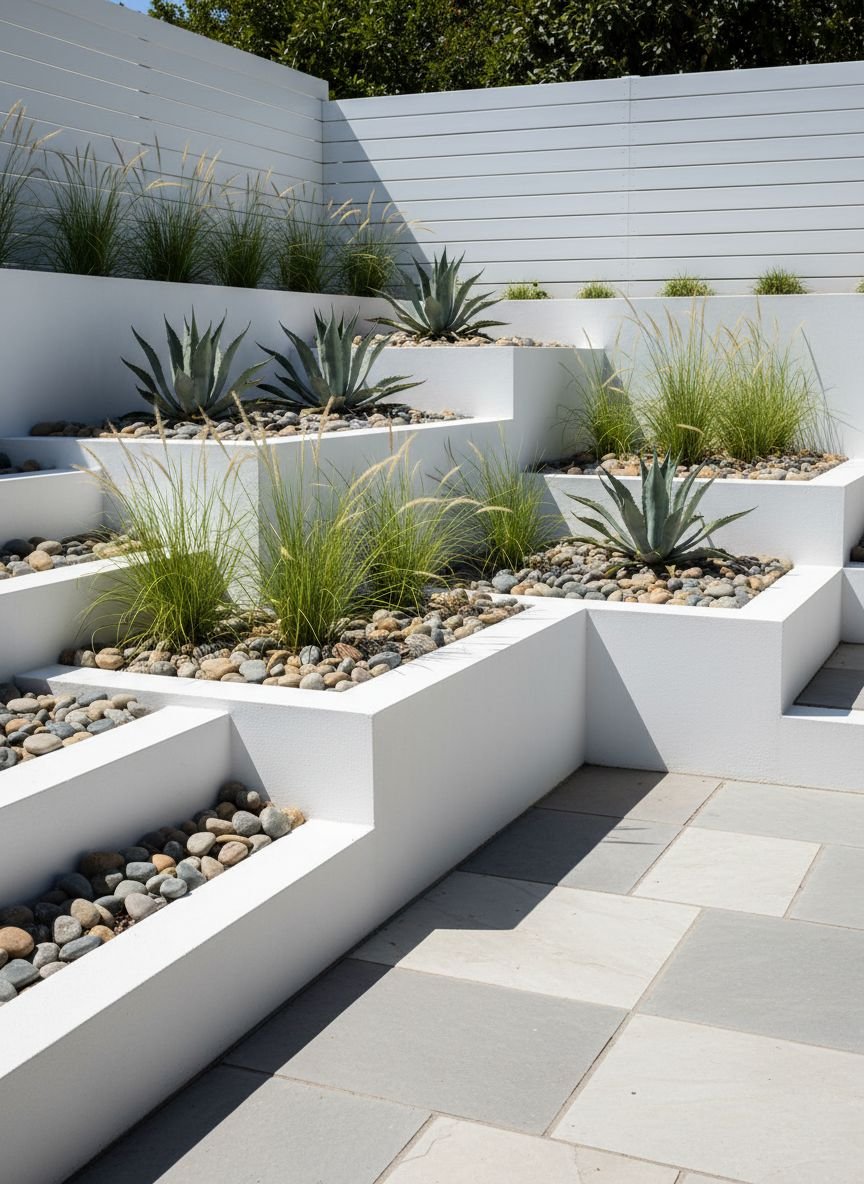
Elevated beds are usually made of wood, but building them with rock gabions (wire cages filled with rocks) or stacked stone offers superior durability. Wood rots eventually; stone lasts forever. An elevated rock bed brings the plants up to eye level and waist level, making weeding and planting much easier on your back.
The rock walls absorb heat, warming the soil earlier in the spring and allowing you to plant sooner. This style looks incredibly structural and industrial-chic. You can fill the wire cages with inexpensive chunky river rock or recycled concrete for a budget-friendly option. The drainage in these beds is exceptional, making them perfect for herbs and vegetables that hate “wet feet.”
Pro Tip: Line the interior of the rock wall with landscape fabric before filling with soil to prevent dirt from washing out through the cracks between the stones.
Reflective river glass paired with rugged stones for a glow-up effect

For a contemporary twist, mix traditional natural stone with tumbled landscape glass. The contrast between the matte, rugged texture of natural boulders and the sleek, shiny surface of the glass is striking. This works particularly well in fire pit areas or near water features where the reflection is doubled.
You do not need to cover the whole yard in glass (which would be expensive). Use it as a top-dressing accent. For example, create a “river” of blue tumbled glass winding through a field of grey river rocks. Or use amber glass around the base of a fire pit to catch the flickering light. It adds a jewelry-like quality to the hardscape.
Pro Tip: Ensure you buy tumbled glass specifically made for landscaping. It has no sharp edges, so it is safe for pets and children to walk on.
Related posts :
- 14 Easy to Make DIY Outdoor Sink Ideas to Upgrade Your Garden That Actually Work
- 18 Stunning Vertical Herb Garden Ideas That Maximize Space & Flavor
- 13 Lush Bathroom Plants for Every Space: From No Sunlight to Small Bathrooms
Popular Asked Questions
What is the cheapest rock for landscaping?
The most budget-friendly options are usually pea gravel and crushed stone (often called gravel or crusher run). These are widely available and require less processing than polished river rocks. Buying in bulk from a local landscape supply yard is significantly cheaper than buying bags from a big-box store.
Do I need to put plastic under landscaping rock?
No, never use plastic. Plastic sheeting traps water, creating a swampy mess that rots plant roots and breeds mosquitoes. Instead, use a high-quality, non-woven landscape fabric (weed barrier). This allows water and air to pass through into the soil while still blocking sunlight to prevent weed growth.
How do you keep weeds out of rock landscaping?
Weeds are persistent, but you can manage them. First, install a high-quality weed barrier fabric under the rocks. Second, keep the rocks clean; blow leaves and debris off regularly, or they will decompose and create a soil layer on top of the fabric where weeds can grow. Finally, use a pre-emergent weed preventer in the spring to stop seeds from germinating.
Is rock landscaping cheaper than mulch?
Upfront, rock is much more expensive than mulch (often 3-5 times the cost). However, rock is a one-time investment. Mulch fades, decomposes, and blows away, requiring replacement every year or two. Over a period of 5-10 years, rock landscaping becomes the cheaper option because it requires zero replacement costs.
Conclusion
Switching to rock landscaping is one of the smartest decisions a homeowner can make. It creates a polished, high-end look that instantly boosts curb appeal while giving you back your weekends. Whether you choose a simple crushed granite path or an elaborate dry creek bed, the durability and beauty of stone are unmatched.


Leave a Comment